Salmon Blanquette is a classic appetizer. Here is the recipe to prepare it perfectly.

🛒 Ingredients:
400g salmon fillets, cubed 🐟
1 large leek, thinly sliced
1 carrot, sliced
200ml whipping cream (30-36%) 🥛
200ml fish or vegetable stock 🍲
1 tablespoon butter 🧈
1 tablespoon wheat flour 🌾
Salt and pepper to taste 🧂
Fresh dill or chives for decoration 🌿
🥣 Directions:
Preparation of the ingredients:

Read more

Zesty Baked Lime Salmon with Avocado Mango Salsa: A Refreshing Fusion of Flavors

Introduction:

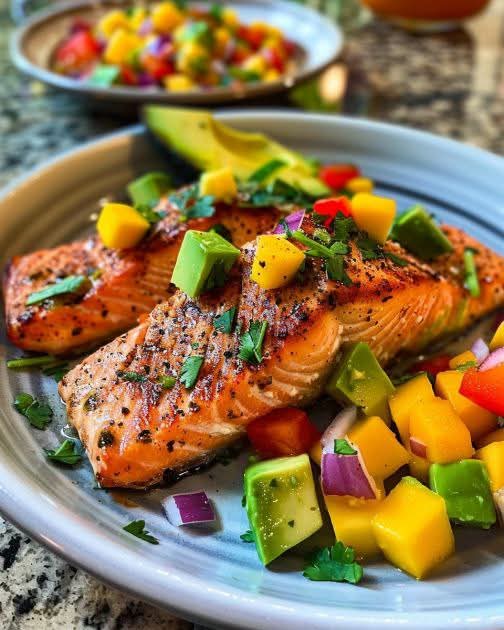
If you’re looking to elevate your dinner routine with a light, fresh, and flavorful dish, look no further than Baked Lime Salmon with Avocado Mango Salsa. This vibrant recipe combines the richness of tender salmon fillets with a zesty lime glaze, paired with a refreshing and tropical salsa of ripe avocado and mango. Perfect for any occasion, whether it’s a weeknight meal or a special gathering, this dish is as nutritious as it is delicious. The contrast between the savory fish and the sweet, tangy salsa will transport your taste buds to a sunny paradise with each bite.

Ingredients:

For the Baked Lime Salmon:

4 salmon fillets (about 6 oz each)
2 tablespoons olive oil
2 tablespoons fresh lime juice (from about 2 limes)
1 teaspoon lime zest
1 teaspoon garlic powder
1 teaspoon paprika
Salt and freshly ground black pepper, to taste
1 tablespoon fresh cilantro, chopped (optional, for garnish)
For the Avocado Mango Salsa:

1 ripe mango, peeled and diced
1 ripe avocado, peeled and diced
1/2 red onion, finely diced
1 small red bell pepper, diced
1 tablespoon fresh cilantro, chopped
1 tablespoon fresh lime juice
1 teaspoon honey (optional, for sweetness)
Salt and pepper, to taste
Instructions:

Preheat the Oven: Begin by preheating your oven to 400°F (200°C). Line a baking sheet with parchment paper or lightly grease it with cooking spray.

Prepare the Salmon: Place the salmon fillets on the prepared baking sheet. Drizzle the olive oil and lime juice over each fillet, ensuring they are evenly coated. Sprinkle with lime zest, garlic powder, paprika, salt, and pepper. Use your hands to gently rub the seasonings into the fish for full flavor.

Bake the Salmon: Place the salmon fillets in the oven and bake for about 12-15 minutes, or until the salmon is cooked through and flakes easily with a fork. The baking time will depend on the thickness of the fillets, so keep an eye on them to avoid overcooking.

Make the Salsa: While the salmon is baking, prepare the avocado mango salsa. In a medium bowl, combine the diced mango, avocado, red onion, red bell pepper, and cilantro. Add the lime juice and honey (if using) and season with salt and pepper to taste. Gently stir to combine, being careful not to mash the avocado.

Serve: Once the salmon is baked and ready, remove it from the oven and let it rest for a few minutes. Plate each salmon fillet and top with a generous spoonful of the avocado mango salsa. Garnish with additional cilantro, if desired, and serve immediately.

Tips for Serving and Storing:

Serving: This dish pairs wonderfully with a variety of sides such as quinoa, rice, roasted vegetables, or a simple green salad. If you want to make it a complete tropical meal, serve with coconut rice or grilled pineapple wedges for a delicious contrast.

Storing: Store any leftover salmon and salsa separately in airtight containers. The salmon will stay fresh in the refrigerator for up to 2 days. The salsa is best enjoyed fresh, but can be kept in the fridge for 1-2 days—though the avocado may begin to brown over time. To prevent browning, you can add extra lime juice to the salsa before storing it.

Read more

Deliciously Creamy Sun-Dried Tomato Chicken: A Savory Delight for Any Occasion

Introduction:

Looking for a flavorful, comforting meal that combines the rich taste of sun-dried tomatoes with the tender succulence of chicken? Look no further than this creamy Sun-Dried Tomato Chicken recipe! This dish blends creamy sauce, aromatic garlic, and savory sun-dried tomatoes, creating a symphony of flavors that’s perfect for any dinner table. Whether you’re serving it for a casual weeknight meal or a special occasion, this recipe is sure to impress.

Ingredients:

4 boneless, skinless chicken breasts
2 tbsp olive oil
Salt and pepper, to taste
1 medium onion, finely chopped
4 cloves garlic, minced
1/2 cup sun-dried tomatoes, chopped (in oil, drained)
1 cup heavy cream
1/2 cup chicken broth
1/4 cup grated Parmesan cheese
1 tsp dried Italian seasoning
Fresh basil, for garnish (optional)
Instructions:

Prepare the Chicken: Start by seasoning the chicken breasts with salt and pepper on both sides. Heat the olive oil in a large skillet over medium-high heat.


Cook the Chicken: Add the chicken breasts to the pan and cook for 5-7 minutes on each side, or until golden brown and cooked through. Remove the chicken from the skillet and set it aside.

Sauté the Aromatics: In the same skillet, add the chopped onion and garlic. Sauté for 2-3 minutes, or until softened and fragrant.

Add Sun-Dried Tomatoes: Stir in the sun-dried tomatoes, cooking for another minute to release their flavors.

Make the Creamy Sauce: Pour in the chicken broth and bring to a simmer. Once the broth has reduced slightly, stir in the heavy cream, Parmesan cheese, and Italian seasoning. Let the sauce simmer for 3-4 minutes, until it thickens.

Combine Chicken with Sauce: Return the chicken breasts to the skillet, spooning the sauce over them. Let everything simmer together for another 5 minutes, allowing the flavors to meld.

Serve: Garnish with fresh basil if desired and serve the creamy sun-dried tomato chicken over pasta, rice, or steamed vegetables for a complete meal.

Tips for Serving and Storing:

Serving: For an extra indulgent meal, serve the creamy sun-dried tomato chicken over a bed of fettuccine or mashed potatoes. The rich sauce will coat the pasta or potatoes perfectly. Alternatively, you can pair it with roasted vegetables or a simple green salad for a lighter option.

Storing: Leftovers can be stored in an airtight container in the refrigerator for up to 3 days. To reheat, warm gently over low heat on the stovetop, adding a splash of cream or broth if the sauce has thickened too much.

Read more

Delicious Minced Potato Rolls: A Comforting Snack with a Twist

Introduction:
Minced potato rolls are an irresistible treat, combining soft, spiced mashed potatoes with a crispy outer layer that is perfect for snacking, appetizers, or even a quick meal. This versatile recipe can be customized with various seasonings and fillings, making it a favorite among all ages. Whether you’re hosting a gathering or simply craving something satisfying, these potato rolls are sure to delight your taste buds.

Ingredients:
4 medium potatoes, peeled and boiled
1 small onion, finely chopped
1/2 cup grated cheese (cheddar or mozzarella works best)
1/4 cup chopped fresh coriander
1 teaspoon cumin seeds
1/2 teaspoon turmeric powder
1 teaspoon garam masala
1/2 teaspoon chili powder (adjust to taste)
Salt to taste
2 tablespoons butter or oil
8-10 soft flour tortillas or rolled flatbreads
Oil for frying
Instructions:
Prepare the Potato Filling:
Begin by boiling the potatoes until they are soft. Drain them and mash them thoroughly in a large mixing bowl.


Cook the Spices:
In a pan, heat the butter or oil and sauté the cumin seeds until they start to splutter. Add the chopped onions and cook until they are golden brown. Stir in the turmeric powder, garam masala, and chili powder, cooking for another minute to release the flavors.

Combine the Filling:
Add the mashed potatoes to the spiced onion mixture, and stir well to combine. Add the grated cheese and chopped coriander, and mix everything together. Adjust salt and spices to taste.

Assemble the Rolls:
Lay a tortilla or flatbread flat on a clean surface. Place a generous amount of the potato filling in the center, then carefully fold the sides of the tortilla over the filling, rolling it tightly. Repeat this for all tortillas.

Fry the Rolls:
Heat oil in a pan over medium heat. Fry each rolled-up potato tortilla until golden and crispy on all sides. This usually takes about 3-4 minutes per side.

Serve Hot:
Once the rolls are crispy and golden, remove them from the oil and drain on a paper towel. Serve hot with chutney, ketchup, or your favorite dip.

Tips for Serving and Storing:
Serving Ideas:
Minced potato rolls are perfect for serving with tangy tamarind chutney, mint yogurt dip, or even a simple ketchup. They also pair wonderfully with a fresh green salad for a more filling meal.

Storing:
If you have leftovers, store the rolls in an airtight container in the refrigerator for up to 2-3 days. To reheat, you can lightly toast them in a pan or oven to restore their crispiness.

Make Ahead:
You can prepare the filling ahead of time and store it in the fridge for up to a day before assembling and frying the rolls. This will save time when you are ready to cook.

Read more

A Decadent Baked Lobster Feast: The Ultimate Seafood Delight

Introduction
If you’re looking for an extravagant and flavorful seafood dish, a Baked Lobster Feast should be at the top of your list. This indulgent recipe combines the delicate sweetness of lobster with the rich flavors of butter, garlic, and fresh herbs. It’s perfect for special occasions, romantic dinners, or simply when you want to treat yourself to a luxurious meal. The combination of crispy, golden-baked lobster tails with a zesty topping creates a dish that will surely leave your guests in awe. Here’s how to create the perfect Baked Lobster Feast.

Ingredients
For the Lobster:

4 lobster tails (fresh or frozen)
2 tbsp olive oil
2 tbsp lemon juice
Salt and freshly cracked black pepper, to taste
1 garlic clove, minced
1/2 tsp smoked paprika (optional)
1 tbsp fresh parsley, chopped
For the Butter Sauce:

1/2 cup unsalted butter (1 stick)
2 garlic cloves, minced
1/4 cup dry white wine (or seafood broth)
1 tbsp lemon juice
1 tbsp fresh parsley, chopped
1/2 tsp red pepper flakes (optional)
For Topping:

1/2 cup breadcrumbs (preferably panko)
1/4 cup grated Parmesan cheese
2 tbsp unsalted butter, melted
1 tbsp fresh thyme or rosemary (optional)
Instructions
Preheat the Oven: Start by preheating your oven to 375°F (190°C).

Prepare the Lobster Tails: Using kitchen shears, cut the top of the lobster shells lengthwise, exposing the lobster meat. Gently pull the meat upward so it rests on top of the shell. Use a small knife to carefully loosen the meat from the bottom shell, leaving it attached at the base. This technique, called “piggybacking,” helps to create a beautiful presentation.

Season the Lobster: Drizzle the lobster tails with olive oil and lemon juice. Sprinkle with salt, pepper, minced garlic, smoked paprika, and freshly chopped parsley.

Make the Butter Sauce: In a small saucepan over medium heat, melt the butter. Add minced garlic and sauté until fragrant, about 1-2 minutes. Stir in the white wine, lemon juice, and parsley. If you like a spicy kick, add a pinch of red pepper flakes. Let the mixture simmer for 2-3 minutes, then remove from heat.

Prepare the Topping: In a small bowl, combine the breadcrumbs, Parmesan cheese, melted butter, and fresh herbs (if using). Mix well until the breadcrumbs are evenly coated.

Assemble the Lobster Tails: Place the prepared lobster tails on a baking sheet lined with parchment paper. Spoon a bit of the butter sauce over each lobster tail, then top with a generous amount of the breadcrumb mixture.

Bake the Lobster: Bake in the preheated oven for 12-15 minutes, or until the lobster meat is opaque and the breadcrumbs are golden brown and crispy. You can also broil the lobster for the last 2-3 minutes for extra crispiness on top.

Serve and Enjoy: Once done, remove the lobster tails from the oven and drizzle with the remaining butter sauce. Garnish with extra parsley, and serve with lemon wedges on the side.

Tips for Serving and Storing

Read more

Spicy Shrimp with Mauritian Flavors: A Flavorful Seafood Delight

Introduction:

Mauritius, a tropical island in the Indian Ocean, is renowned for its rich and diverse culinary traditions. The island’s cuisine reflects a blend of African, French, Indian, and Chinese influences, creating an explosion of flavors. One such delightful dish that embodies this fusion is Shrimp with Mauritian Spices. Infused with fragrant spices, fresh herbs, and a kick of heat, this dish is perfect for anyone craving a burst of exotic flavors. Whether served as an appetizer or a main course, this shrimp recipe will transport your taste buds straight to the vibrant island of Mauritius.

Ingredients:

  • 500g large shrimp, peeled and deveined
  • 2 tbsp vegetable oil
  • 1 onion, finely chopped
  • 3 cloves garlic, minced
  • 1-inch piece of ginger, minced
  • 1 green chili, chopped (optional for extra heat)
  • 1 tsp cumin seeds
  • 1 tsp coriander powder
  • 1 tsp turmeric powder
  • 1 tsp ground cinnamon
  • ½ tsp chili powder
  • 1 tbsp fresh lime juice
  • 1 tbsp soy sauce
  • 1 tbsp fresh cilantro, chopped
  • Salt and pepper to taste

Instructions:

  1. Prep the shrimp: Rinse the shrimp thoroughly under cold water and pat them dry with a paper towel. Season with a pinch of salt and pepper and set aside.
  2. Cook the spices: In a large skillet or pan, heat the vegetable oil over medium heat. Add the cumin seeds and let them sizzle for a few seconds until aromatic.
  3. Sauté the aromatics: Add the chopped onion, garlic, and ginger to the pan. Cook for 3-4 minutes, stirring occasionally, until the onions are soft and golden brown. If you like extra spice, add the chopped green chili at this stage.
  4. Add the spices: Stir in the coriander powder, turmeric powder, ground cinnamon, and chili powder. Cook for another 2-3 minutes to allow the spices to bloom and release their fragrance.
  5. Cook the shrimp: Add the seasoned shrimp to the pan and cook for 4-5 minutes, turning them occasionally until they turn pink and are cooked through.
  6. Finish with lime and soy sauce: Squeeze fresh lime juice over the shrimp and drizzle with soy sauce. Stir well to combine all the flavors.
  7. Garnish: Sprinkle freshly chopped cilantro on top before serving.

Tips for Serving and Storing:

Read more

A Zesty Twist on Tradition: Roasted Pork Ham with Orange

Introduction: Roasted Pork Ham with Orange is a perfect blend of savory and sweet, combining the richness of tender pork with the vibrant tang of citrus. This recipe is an ideal choice for family gatherings, festive meals, or special occasions. The juicy, caramelized orange glaze enhances the pork’s natural flavors while infusing it with a refreshing citrusy note. Whether you are looking to add a unique touch to your holiday dinner or simply enjoy a delicious roast, this dish will surely impress.

Ingredients:

1 bone-in pork ham (around 4-5 lbs)
2 large oranges (zested and juiced)
1/4 cup brown sugar
1/4 cup honey
1/4 cup Dijon mustard
3 tbsp olive oil
2 cloves garlic, minced
1 tsp ground cinnamon
1/2 tsp ground cloves
1/2 tsp ground ginger
Salt and pepper to taste
Fresh thyme or rosemary sprigs (optional, for garnish)
Instructions:

Preheat the oven to 350°F (175°C). Line a roasting pan with parchment paper or lightly grease it with oil to prevent sticking.

Prepare the pork ham: Pat the pork ham dry with paper towels. Score the fat in a crisscross pattern, making sure not to cut into the meat. This will help the glaze penetrate and allow the fat to render during roasting.

Make the glaze: In a small saucepan, combine the orange juice, zest, brown sugar, honey, Dijon mustard, minced garlic, cinnamon, cloves, ginger, and olive oil. Bring the mixture to a simmer over medium heat. Stir occasionally until the sugar dissolves and the glaze thickens, about 5-7 minutes. Remove from heat and set aside.

Season the ham: Rub the pork ham with salt and pepper. Place it in the prepared roasting pan, fat side up.

Roast the pork: Brush a generous amount of the orange glaze over the surface of the ham. Place the ham in the oven and roast for 1.5 to 2 hours, basting the pork with the glaze every 30 minutes. The internal temperature should reach 145°F (63°C) when measured with a meat thermometer.

Finish and rest: Once the ham is fully cooked, remove it from the oven and let it rest for 10-15 minutes before slicing. This allows the juices to redistribute throughout the meat.

Serve: Slice the ham and drizzle with any remaining glaze. Garnish with fresh herbs like thyme or rosemary for an added touch of flavor and elegance.

Tips for Serving and Storing:

Serving: Serve your roasted pork ham with a side of roasted vegetables, mashed potatoes, or a fresh salad. The tangy orange glaze pairs wonderfully with earthy sides like root vegetables or even a simple green bean almondine.

Storing: Leftover pork ham can be stored in an airtight container in the refrigerator for up to 3 days. Reheat gently in the oven or on the stovetop, basting with a little more glaze if needed.

Freezing: You can freeze leftover slices of ham in a tightly sealed bag or container for up to 2 months. Thaw in the refrigerator overnight before reheating.

Variants:

Read more