Deliciously Creamy Sun-Dried Tomato Chicken: A Savory Delight for Any Occasion

Introduction:

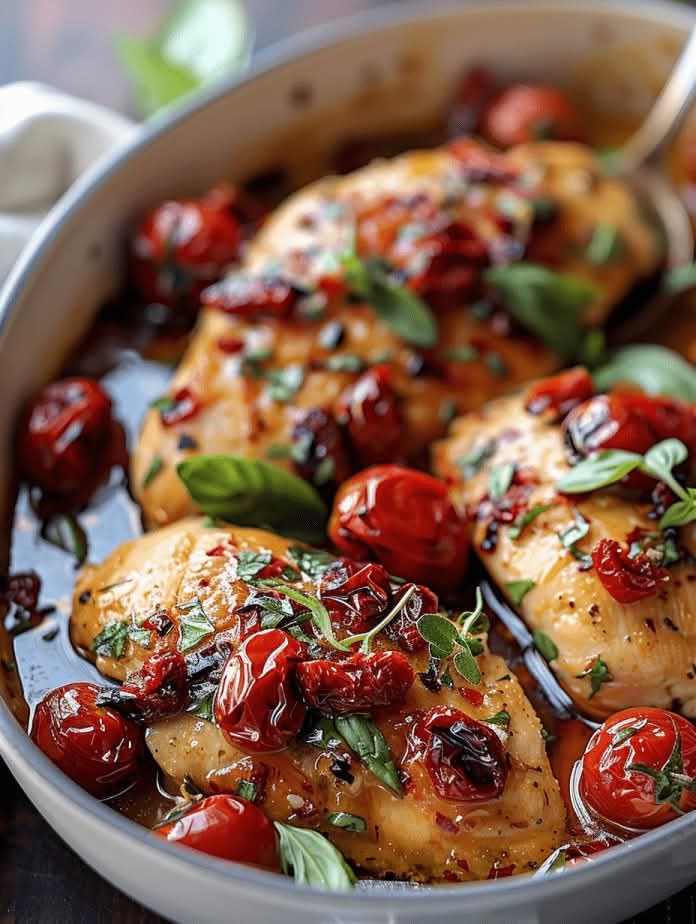
Looking for a flavorful, comforting meal that combines the rich taste of sun-dried tomatoes with the tender succulence of chicken? Look no further than this creamy Sun-Dried Tomato Chicken recipe! This dish blends creamy sauce, aromatic garlic, and savory sun-dried tomatoes, creating a symphony of flavors that’s perfect for any dinner table. Whether you’re serving it for a casual weeknight meal or a special occasion, this recipe is sure to impress.

Ingredients:

4 boneless, skinless chicken breasts
2 tbsp olive oil
Salt and pepper, to taste
1 medium onion, finely chopped
4 cloves garlic, minced
1/2 cup sun-dried tomatoes, chopped (in oil, drained)
1 cup heavy cream
1/2 cup chicken broth
1/4 cup grated Parmesan cheese
1 tsp dried Italian seasoning
Fresh basil, for garnish (optional)
Instructions:

Prepare the Chicken: Start by seasoning the chicken breasts with salt and pepper on both sides. Heat the olive oil in a large skillet over medium-high heat.


Cook the Chicken: Add the chicken breasts to the pan and cook for 5-7 minutes on each side, or until golden brown and cooked through. Remove the chicken from the skillet and set it aside.

Sauté the Aromatics: In the same skillet, add the chopped onion and garlic. Sauté for 2-3 minutes, or until softened and fragrant.

Add Sun-Dried Tomatoes: Stir in the sun-dried tomatoes, cooking for another minute to release their flavors.

Make the Creamy Sauce: Pour in the chicken broth and bring to a simmer. Once the broth has reduced slightly, stir in the heavy cream, Parmesan cheese, and Italian seasoning. Let the sauce simmer for 3-4 minutes, until it thickens.

Combine Chicken with Sauce: Return the chicken breasts to the skillet, spooning the sauce over them. Let everything simmer together for another 5 minutes, allowing the flavors to meld.

Serve: Garnish with fresh basil if desired and serve the creamy sun-dried tomato chicken over pasta, rice, or steamed vegetables for a complete meal.

Tips for Serving and Storing:

Serving: For an extra indulgent meal, serve the creamy sun-dried tomato chicken over a bed of fettuccine or mashed potatoes. The rich sauce will coat the pasta or potatoes perfectly. Alternatively, you can pair it with roasted vegetables or a simple green salad for a lighter option.

Storing: Leftovers can be stored in an airtight container in the refrigerator for up to 3 days. To reheat, warm gently over low heat on the stovetop, adding a splash of cream or broth if the sauce has thickened too much.

Read more

Delicious Minced Potato Rolls: A Comforting Snack with a Twist

Introduction:
Minced potato rolls are an irresistible treat, combining soft, spiced mashed potatoes with a crispy outer layer that is perfect for snacking, appetizers, or even a quick meal. This versatile recipe can be customized with various seasonings and fillings, making it a favorite among all ages. Whether you’re hosting a gathering or simply craving something satisfying, these potato rolls are sure to delight your taste buds.

Ingredients:
4 medium potatoes, peeled and boiled
1 small onion, finely chopped
1/2 cup grated cheese (cheddar or mozzarella works best)
1/4 cup chopped fresh coriander
1 teaspoon cumin seeds
1/2 teaspoon turmeric powder
1 teaspoon garam masala
1/2 teaspoon chili powder (adjust to taste)
Salt to taste
2 tablespoons butter or oil
8-10 soft flour tortillas or rolled flatbreads
Oil for frying
Instructions:
Prepare the Potato Filling:
Begin by boiling the potatoes until they are soft. Drain them and mash them thoroughly in a large mixing bowl.


Cook the Spices:
In a pan, heat the butter or oil and sauté the cumin seeds until they start to splutter. Add the chopped onions and cook until they are golden brown. Stir in the turmeric powder, garam masala, and chili powder, cooking for another minute to release the flavors.

Combine the Filling:
Add the mashed potatoes to the spiced onion mixture, and stir well to combine. Add the grated cheese and chopped coriander, and mix everything together. Adjust salt and spices to taste.

Assemble the Rolls:
Lay a tortilla or flatbread flat on a clean surface. Place a generous amount of the potato filling in the center, then carefully fold the sides of the tortilla over the filling, rolling it tightly. Repeat this for all tortillas.

Fry the Rolls:
Heat oil in a pan over medium heat. Fry each rolled-up potato tortilla until golden and crispy on all sides. This usually takes about 3-4 minutes per side.

Serve Hot:
Once the rolls are crispy and golden, remove them from the oil and drain on a paper towel. Serve hot with chutney, ketchup, or your favorite dip.

Tips for Serving and Storing:
Serving Ideas:
Minced potato rolls are perfect for serving with tangy tamarind chutney, mint yogurt dip, or even a simple ketchup. They also pair wonderfully with a fresh green salad for a more filling meal.

Storing:
If you have leftovers, store the rolls in an airtight container in the refrigerator for up to 2-3 days. To reheat, you can lightly toast them in a pan or oven to restore their crispiness.

Make Ahead:
You can prepare the filling ahead of time and store it in the fridge for up to a day before assembling and frying the rolls. This will save time when you are ready to cook.

Read more

Spicy Shrimp with Mauritian Flavors: A Flavorful Seafood Delight

Introduction:

Mauritius, a tropical island in the Indian Ocean, is renowned for its rich and diverse culinary traditions. The island’s cuisine reflects a blend of African, French, Indian, and Chinese influences, creating an explosion of flavors. One such delightful dish that embodies this fusion is Shrimp with Mauritian Spices. Infused with fragrant spices, fresh herbs, and a kick of heat, this dish is perfect for anyone craving a burst of exotic flavors. Whether served as an appetizer or a main course, this shrimp recipe will transport your taste buds straight to the vibrant island of Mauritius.

Ingredients:

  • 500g large shrimp, peeled and deveined
  • 2 tbsp vegetable oil
  • 1 onion, finely chopped
  • 3 cloves garlic, minced
  • 1-inch piece of ginger, minced
  • 1 green chili, chopped (optional for extra heat)
  • 1 tsp cumin seeds
  • 1 tsp coriander powder
  • 1 tsp turmeric powder
  • 1 tsp ground cinnamon
  • ½ tsp chili powder
  • 1 tbsp fresh lime juice
  • 1 tbsp soy sauce
  • 1 tbsp fresh cilantro, chopped
  • Salt and pepper to taste

Instructions:

  1. Prep the shrimp: Rinse the shrimp thoroughly under cold water and pat them dry with a paper towel. Season with a pinch of salt and pepper and set aside.
  2. Cook the spices: In a large skillet or pan, heat the vegetable oil over medium heat. Add the cumin seeds and let them sizzle for a few seconds until aromatic.
  3. Sauté the aromatics: Add the chopped onion, garlic, and ginger to the pan. Cook for 3-4 minutes, stirring occasionally, until the onions are soft and golden brown. If you like extra spice, add the chopped green chili at this stage.
  4. Add the spices: Stir in the coriander powder, turmeric powder, ground cinnamon, and chili powder. Cook for another 2-3 minutes to allow the spices to bloom and release their fragrance.
  5. Cook the shrimp: Add the seasoned shrimp to the pan and cook for 4-5 minutes, turning them occasionally until they turn pink and are cooked through.
  6. Finish with lime and soy sauce: Squeeze fresh lime juice over the shrimp and drizzle with soy sauce. Stir well to combine all the flavors.
  7. Garnish: Sprinkle freshly chopped cilantro on top before serving.

Tips for Serving and Storing:

Read more

A Zesty Twist on Tradition: Roasted Pork Ham with Orange

Introduction: Roasted Pork Ham with Orange is a perfect blend of savory and sweet, combining the richness of tender pork with the vibrant tang of citrus. This recipe is an ideal choice for family gatherings, festive meals, or special occasions. The juicy, caramelized orange glaze enhances the pork’s natural flavors while infusing it with a refreshing citrusy note. Whether you are looking to add a unique touch to your holiday dinner or simply enjoy a delicious roast, this dish will surely impress.

Ingredients:

1 bone-in pork ham (around 4-5 lbs)
2 large oranges (zested and juiced)
1/4 cup brown sugar
1/4 cup honey
1/4 cup Dijon mustard
3 tbsp olive oil
2 cloves garlic, minced
1 tsp ground cinnamon
1/2 tsp ground cloves
1/2 tsp ground ginger
Salt and pepper to taste
Fresh thyme or rosemary sprigs (optional, for garnish)
Instructions:

Preheat the oven to 350°F (175°C). Line a roasting pan with parchment paper or lightly grease it with oil to prevent sticking.

Prepare the pork ham: Pat the pork ham dry with paper towels. Score the fat in a crisscross pattern, making sure not to cut into the meat. This will help the glaze penetrate and allow the fat to render during roasting.

Make the glaze: In a small saucepan, combine the orange juice, zest, brown sugar, honey, Dijon mustard, minced garlic, cinnamon, cloves, ginger, and olive oil. Bring the mixture to a simmer over medium heat. Stir occasionally until the sugar dissolves and the glaze thickens, about 5-7 minutes. Remove from heat and set aside.

Season the ham: Rub the pork ham with salt and pepper. Place it in the prepared roasting pan, fat side up.

Roast the pork: Brush a generous amount of the orange glaze over the surface of the ham. Place the ham in the oven and roast for 1.5 to 2 hours, basting the pork with the glaze every 30 minutes. The internal temperature should reach 145°F (63°C) when measured with a meat thermometer.

Finish and rest: Once the ham is fully cooked, remove it from the oven and let it rest for 10-15 minutes before slicing. This allows the juices to redistribute throughout the meat.

Serve: Slice the ham and drizzle with any remaining glaze. Garnish with fresh herbs like thyme or rosemary for an added touch of flavor and elegance.

Tips for Serving and Storing:

Serving: Serve your roasted pork ham with a side of roasted vegetables, mashed potatoes, or a fresh salad. The tangy orange glaze pairs wonderfully with earthy sides like root vegetables or even a simple green bean almondine.

Storing: Leftover pork ham can be stored in an airtight container in the refrigerator for up to 3 days. Reheat gently in the oven or on the stovetop, basting with a little more glaze if needed.

Freezing: You can freeze leftover slices of ham in a tightly sealed bag or container for up to 2 months. Thaw in the refrigerator overnight before reheating.

Variants:

Read more

Classic Corned Beef Hash with Crispy Potatoes: A Hearty Comfort Dish

Introduction:
Looking for a flavorful, comforting dish that brings a nostalgic twist to your meal? Classic Corned Beef Hash with Crispy Potatoes is the answer! This dish brings together tender corned beef, crispy potatoes, and a savory blend of seasonings that make for the ultimate breakfast, brunch, or dinner. Whether you’re using leftovers or preparing it fresh, this recipe is a crowd-pleaser that satisfies every craving with its balance of textures and rich flavors.

Ingredients:
2 cups cooked corned beef, chopped into small cubes
2 medium potatoes, peeled and diced into small cubes
1 medium onion, diced
1 bell pepper, diced (optional)
2 cloves garlic, minced
2 tablespoons olive oil (or butter for extra richness)
Salt and pepper, to taste
1/2 teaspoon smoked paprika (optional for extra flavor)
Fresh parsley, chopped (for garnish)
2 eggs (optional, for serving)
Instructions:
Prepare the Potatoes: Heat 1 tablespoon of olive oil in a large skillet over medium-high heat. Add the diced potatoes and season with salt, pepper, and smoked paprika. Cook, stirring occasionally, until they are golden brown and crispy on all sides (about 10-12 minutes). Once cooked, transfer them to a plate and set aside.

Cook the Vegetables: In the same skillet, add the remaining tablespoon of olive oil. Sauté the diced onion, bell pepper (if using), and minced garlic until softened and fragrant, about 4-5 minutes.

Combine Corned Beef: Add the chopped corned beef to the skillet with the sautéed vegetables. Stir everything together and cook for another 3-4 minutes, allowing the corned beef to heat through and develop a little bit of crispy edges.

Reintroduce the Potatoes: Add the crispy potatoes back into the skillet, mixing everything together. Cook for an additional 2-3 minutes to ensure the flavors are well combined.

Serve: For a complete breakfast or brunch, top with a fried or poached egg. Garnish with freshly chopped parsley before serving.

Tips for Serving and Storing:
Serving Suggestions: Serve this dish with a side of toast or some hot sauce for an added kick. For a fuller breakfast, you can pair it with avocado slices or a side salad for extra freshness.

Storing: Leftover corned beef hash can be stored in an airtight container in the refrigerator for up to 3 days. Reheat in a skillet over medium heat, adding a bit of oil or butter to restore the crispiness. Alternatively, it can be stored in the freezer for up to a month.

Read more

Savor the Flavor: Beef Tenderloin with Creamy Mushroom Sauce

Introduction:
Beef tenderloin is often referred to as one of the most luxurious cuts of meat, prized for its tenderness and delicate flavor. When paired with a rich, creamy mushroom sauce, this dish transforms into a decadent meal perfect for special occasions or a sophisticated dinner at home. The tender beef complemented by the earthy flavor of the mushrooms and the smooth creaminess of the sauce creates an unforgettable dining experience. Whether you’re celebrating a milestone or treating yourself to an elegant meal, this recipe will impress even the most discerning palates.

Ingredients:

2 beef tenderloin steaks (6-8 oz each), trimmed
1 tablespoon olive oil
1 tablespoon butter
Salt and freshly ground black pepper, to taste
1 medium onion, finely chopped
2 cloves garlic, minced
8 oz cremini or white mushrooms, sliced
1 cup heavy cream
1/2 cup beef broth
1 teaspoon Dijon mustard
1 teaspoon Worcestershire sauce
Fresh thyme or parsley for garnish (optional)
Instructions:

Prepare the Beef Tenderloin:
Season the beef tenderloin steaks with salt and pepper on both sides. In a large skillet, heat olive oil over medium-high heat. Once the oil is hot, add the steaks to the skillet and sear them for about 3-4 minutes per side for medium-rare, or adjust the cooking time according to your desired level of doneness. Remove the steaks from the skillet and set them aside, covering loosely with foil to rest.

Prepare the Mushroom Sauce:
In the same skillet, melt the butter over medium heat. Add the chopped onions and cook until softened, about 3-4 minutes. Add the minced garlic and cook for an additional 30 seconds, until fragrant.

Cook the Mushrooms:
Add the sliced mushrooms to the skillet and sauté for 5-7 minutes, or until they release their moisture and become golden brown.

Make the Creamy Sauce:
Pour in the beef broth, Dijon mustard, and Worcestershire sauce, stirring to combine. Let it simmer for 2-3 minutes, allowing the broth to reduce slightly. Pour in the heavy cream, stirring until the sauce becomes thick and creamy, about 3-4 minutes. Season the sauce with salt and pepper to taste.

Finish the Dish:
Return the beef tenderloin steaks to the skillet, spooning some of the mushroom sauce over them. Allow the steaks to heat through in the sauce for about 2 minutes.

Read more

A Decadent Baked Lobster Feast: The Ultimate Seafood Delight

Introduction
If you’re looking for an extravagant and flavorful seafood dish, a Baked Lobster Feast should be at the top of your list. This indulgent recipe combines the delicate sweetness of lobster with the rich flavors of butter, garlic, and fresh herbs. It’s perfect for special occasions, romantic dinners, or simply when you want to treat yourself to a luxurious meal. The combination of crispy, golden-baked lobster tails with a zesty topping creates a dish that will surely leave your guests in awe. Here’s how to create the perfect Baked Lobster Feast.

Ingredients
For the Lobster:

4 lobster tails (fresh or frozen)
2 tbsp olive oil
2 tbsp lemon juice
Salt and freshly cracked black pepper, to taste
1 garlic clove, minced
1/2 tsp smoked paprika (optional)
1 tbsp fresh parsley, chopped
For the Butter Sauce:

1/2 cup unsalted butter (1 stick)
2 garlic cloves, minced
1/4 cup dry white wine (or seafood broth)
1 tbsp lemon juice
1 tbsp fresh parsley, chopped
1/2 tsp red pepper flakes (optional)
For Topping:

1/2 cup breadcrumbs (preferably panko)
1/4 cup grated Parmesan cheese
2 tbsp unsalted butter, melted
1 tbsp fresh thyme or rosemary (optional)
Instructions
Preheat the Oven: Start by preheating your oven to 375°F (190°C).

Prepare the Lobster Tails: Using kitchen shears, cut the top of the lobster shells lengthwise, exposing the lobster meat. Gently pull the meat upward so it rests on top of the shell. Use a small knife to carefully loosen the meat from the bottom shell, leaving it attached at the base. This technique, called “piggybacking,” helps to create a beautiful presentation.

Season the Lobster: Drizzle the lobster tails with olive oil and lemon juice. Sprinkle with salt, pepper, minced garlic, smoked paprika, and freshly chopped parsley.

Make the Butter Sauce: In a small saucepan over medium heat, melt the butter. Add minced garlic and sauté until fragrant, about 1-2 minutes. Stir in the white wine, lemon juice, and parsley. If you like a spicy kick, add a pinch of red pepper flakes. Let the mixture simmer for 2-3 minutes, then remove from heat.

Prepare the Topping: In a small bowl, combine the breadcrumbs, Parmesan cheese, melted butter, and fresh herbs (if using). Mix well until the breadcrumbs are evenly coated.

Assemble the Lobster Tails: Place the prepared lobster tails on a baking sheet lined with parchment paper. Spoon a bit of the butter sauce over each lobster tail, then top with a generous amount of the breadcrumb mixture.

Bake the Lobster: Bake in the preheated oven for 12-15 minutes, or until the lobster meat is opaque and the breadcrumbs are golden brown and crispy. You can also broil the lobster for the last 2-3 minutes for extra crispiness on top.

Serve and Enjoy: Once done, remove the lobster tails from the oven and drizzle with the remaining butter sauce. Garnish with extra parsley, and serve with lemon wedges on the side.

Tips for Serving and Storing

Read more

Ultimate Crispy Fried Chicken Wings Recipe: A Crispy Delight with Bold Flavors

Introduction:
If you’re a fan of crispy, flavorful fried chicken, look no further! This homemade fried chicken wings recipe delivers the perfect balance of crispy exterior and juicy, tender meat on the inside. Whether you’re preparing for a family meal, game day snack, or a special gathering, these wings will surely be a crowd favorite. With the right blend of spices and the perfect frying technique, you’ll make crispy chicken wings just like your favorite restaurant, but in the comfort of your own kitchen. Let’s dive into this deliciously crispy recipe!

Ingredients:
For the chicken wings:

10–12 chicken wings (drumettes and flats)
1 cup buttermilk
2 teaspoons hot sauce (optional)
Salt and pepper to taste
2 cups all-purpose flour
1 teaspoon paprika
1 teaspoon garlic powder
1 teaspoon onion powder
1 teaspoon cayenne pepper (adjust to taste)
1 teaspoon dried oregano
1/2 teaspoon baking powder (for extra crispiness)
For frying:

3–4 cups vegetable oil (or enough to submerge the wings)
Instructions:
Prep the chicken wings:


Begin by patting the chicken wings dry with paper towels to remove excess moisture. This step helps achieve that crispy skin!
Marinate:

Place the chicken wings in a large bowl. Pour the buttermilk and hot sauce (if using) over the wings. Season with a pinch of salt and pepper. Let the wings marinate in the fridge for at least 30 minutes, or up to 2 hours. The buttermilk helps tenderize the chicken and gives it a delicious flavor.
Prepare the coating:

In a separate shallow dish, combine the flour, paprika, garlic powder, onion powder, cayenne pepper, oregano, baking powder, salt, and pepper. Mix well.
Coat the wings:

After marinating, remove the wings from the buttermilk. Dredge each wing thoroughly in the seasoned flour mixture, ensuring they are fully coated.
Heat the oil:

In a large skillet or deep fryer, heat the vegetable oil over medium-high heat to 350°F (175°C). Use a thermometer to check the temperature.
Fry the wings:


Carefully drop the wings into the hot oil one at a time, being mindful not to overcrowd the pan. Fry the wings in batches for 8-10 minutes, or until they turn golden brown and crispy. The internal temperature should reach 165°F (74°C).
Drain excess oil:

Once the wings are fried, remove them from the oil and place them on a paper towel-lined plate to drain any excess oil.
Serve:

Serve the wings immediately with your favorite dipping sauce and enjoy!
Tips for Serving and Storing:
Serving Suggestions:

Serve these crispy wings with classic sides like French fries, coleslaw, or a fresh green salad. Add a variety of dipping sauces, such as ranch, blue cheese, BBQ sauce, or honey mustard, to suit everyone’s taste.
Storing Leftovers:

If you have leftover wings, let them cool down to room temperature. Store them in an airtight container in the fridge for up to 2-3 days. To reheat, place the wings on a baking sheet and bake at 375°F (190°C) for 10–15 minutes to restore some of that crispiness.
Freezing:

For longer storage, you can freeze the fried wings. Lay them out in a single layer on a baking sheet to freeze them before transferring them to a freezer-safe container. Reheat from frozen in the oven.
Variants:
Spicy Garlic Wings:

For a spicier twist, add more cayenne pepper to the flour mixture or toss the wings in a homemade spicy garlic sauce made with butter, garlic, and hot sauce after frying.
Honey BBQ Wings:

Toss the fried wings in a mixture of honey and BBQ sauce for a sweet and tangy flavor. This variant works especially well if you like a sweeter taste profile.
Lemon Pepper Wings:

Read more

Escalope Savoyarde

Escalope Savoyarde 🧀🍽️
Ingrédients 🍴
4 escalopes de veau 🥩
100g de jambon cru en tranches fines 🍖
150g de fromage à raclette en tranches 🧀
2 œufs 🥚
100g de farine 🍞
100g de chapelure 🥖
Sel et poivre 🧂
Instructions 📝
1️⃣ Préparez les ingrédients :
Assaisonnez les escalopes de veau avec du sel et du poivre 🧂.

Read more

Baked Meat and Potato Casserole with Cheese

Introduction
Welcome to our delicious recipe for Baked Meat and Potato Casserole with Cheese! If you are looking for a hearty and comforting dish that will satisfy even the pickiest eaters, you have come to the right place. This casserole is packed with flavors, textures, and cheesy goodness that will leave everyone asking for seconds. Whether you are preparing a family dinner or hosting a dinner party, this recipe is sure to impress. So, let’s dive in and learn how to make this mouthwatering dish!

Why You’ll Love This Recipe
There are so many reasons to love this Baked Meat and Potato Casserole with Cheese. First and foremost, it is incredibly easy to make. With just a few simple ingredients and minimal prep work, you can have a delicious and satisfying meal on the table in no time. The combination of tender meat, creamy potatoes, and melted cheese creates a symphony of flavors and textures that will leave your taste buds dancing. This recipe is also a great option for those following a low-carb or keto diet, as it is naturally gluten-free and can be easily customized to fit your dietary needs.


Ingredients
Here are the ingredients you will need for this Baked Meat and Potato Casserole with Cheese:

– 1 pound ground beef

– 4 cups potatoes, peeled and thinly sliced

– 1 onion, diced

– 2 cloves garlic, minced

– 1 cup shredded cheddar cheese

– 1 cup milk

– 2 tablespoons all-purpose flour

– 2 tablespoons butter

– Salt and pepper to taste

Step-by-Step Instructions

Read more