
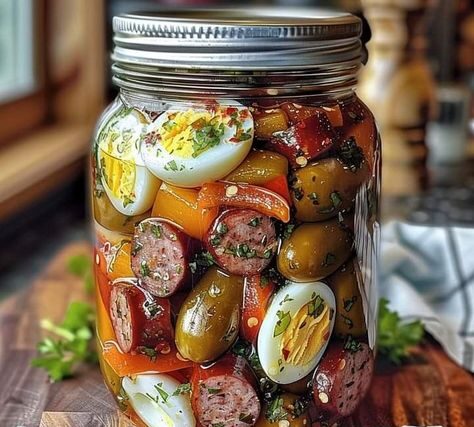
Let’s take a moment to picture this. You’re standing in front of your fridge, searching for that perfect snack. Something quick, something satisfying, and maybe even something a little out of the ordinary. Then you spot it—a jar of pickled eggs, their vibrant hues glowing under the light. Just looking at them brings back memories of their tangy, zesty flavor, and suddenly, you’re craving one.
Pickled eggs are more than just a quirky pantry staple—they’re a delightful combination of convenience and flavor. Whether you’ve been enjoying them for years or are just now discovering their appeal, there’s no denying their charm. And guess what? You can make them yourself at home using not one, but two methods for pickling eggs . By the time you finish reading this, you’ll have all the tools and knowledge you need to create your very own batch of these delicious treats.
But before we dive into the how-to, let’s talk about why pickled eggs deserve a spot in your kitchen repertoire.
The Benefits of Pickled Eggs
First off, eggs are nutritional powerhouses. Packed with high-quality protein, vitamins, and minerals, they’re one of the most versatile ingredients around. When you pickle them, you’re not only preserving their goodness but also adding layers of flavor that make them even more irresistible.
Here’s why you should give pickled eggs a try:
- Nutritional Boost : Eggs are rich in protein, vitamin B12, and selenium, making them a great addition to your diet.
- Longevity : Properly pickled eggs can last weeks in the fridge, giving you a ready-to-eat snack whenever hunger strikes.
- Customizable Flavors : From sweet and tangy to spicy and bold, you can tailor the taste to suit your preferences.
- Eco-Friendly Snacking : Reusing jars and reducing food waste is an added bonus of pickling at home.
Studies show that fermented and pickled foods may even offer gut health benefits, thanks to the probiotics they contain. So, not only are you treating your taste buds, but you’re also doing your body a favor.
Now that you’re convinced of their worth, let’s explore the two methods for pickling eggs. One is steeped in tradition, while the other offers a modern twist. Both are equally delicious, so it’s up to you to decide which one suits your style best.
Method 1 – The Traditional Brine Method
If you’re a fan of classic flavors and don’t mind putting in a bit of effort, the traditional brine method is for you. This technique has stood the test of time for good reason—it delivers a robust, tangy flavor that pairs perfectly with the creaminess of hard-boiled eggs.
Ingredients You’ll Need
Before you get started, gather the following ingredients:
Tip : If you’re unsure where to find pickling spices, most grocery stores carry pre-mixed blends. Alternatively, you can make your own by combining mustard seeds, coriander, cinnamon sticks, bay leaves, and peppercorns.
Step-by-Step Instructions
- Prepare the Eggs : Begin by boiling 12 eggs until they’re fully cooked. Once done, cool them completely under running water and peel off the shells. Pat them dry with a paper towel to ensure they’re free of moisture before pickling.
- Make the Brine : In a saucepan, combine the vinegar, water, sugar, salt, and pickling spices. Bring the mixture to a boil, then reduce the heat and let it simmer for about 5 minutes. This step allows the spices to infuse the liquid with their flavors.
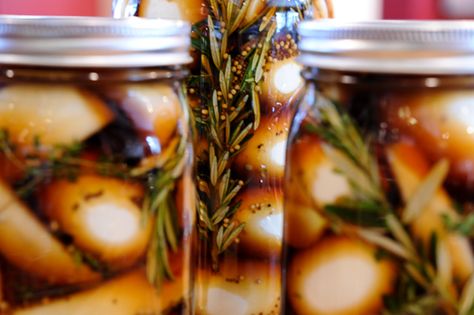
- Pack the Jar : Grab a sterilized glass jar (a quart-sized mason jar works perfectly) and place the peeled eggs inside. Add the garlic cloves for an extra punch of flavor.
- Pour the Brine : Carefully pour the hot brine over the eggs, ensuring they’re fully submerged. Leave about half an inch of space at the top of the jar.
- Seal and Store : Close the jar tightly and give it a gentle shake to distribute the spices evenly. Place it in the refrigerator and let the eggs sit for at least 48 hours. This resting period allows the flavors to meld together beautifully.
Pro Tip : For the best results, use wide-mouth jars to make packing easier.
Method 2 – The Quick-Pickle Method
Short on time but still want to enjoy the magic of pickled eggs? The quick-pickle method is here to save the day. This approach skips the boiling step, making it faster and beginner-friendly without compromising on flavor. Plus, the addition of beet juice gives these eggs a stunning pink hue that’s sure to impress.
Ingredients List
Here’s what you’ll need for this vibrant variation:
Step-by-Step Guide
- Peel and Prep : Start by boiling and peeling 12 eggs. Allow them to cool completely before proceeding.
- Mix the Marinade : In a bowl, whisk together the apple cider vinegar, honey, beet juice, and red pepper flakes. Stir until the honey dissolves completely, creating a smooth marinade.
- Add Flavor : Place the peeled eggs in a clean jar and tuck the fresh dill sprigs between them. The dill adds a subtle herbal note that complements the sweetness of the honey.
- Pour and Chill : Pour the marinade over the eggs, ensuring they’re fully submerged. Seal the jar tightly and refrigerate for at least 24 hours.
Fun Fact : The beet juice not only enhances the flavor but also gives the eggs a gorgeous pink color that makes them Instagram-worthy.